Birthday Sushi

"Birthday Sushi" Austin, 2016
Photo info: FUJIFILM X100T, 23mm, f/3.2, 1/90 sec, ISO6400
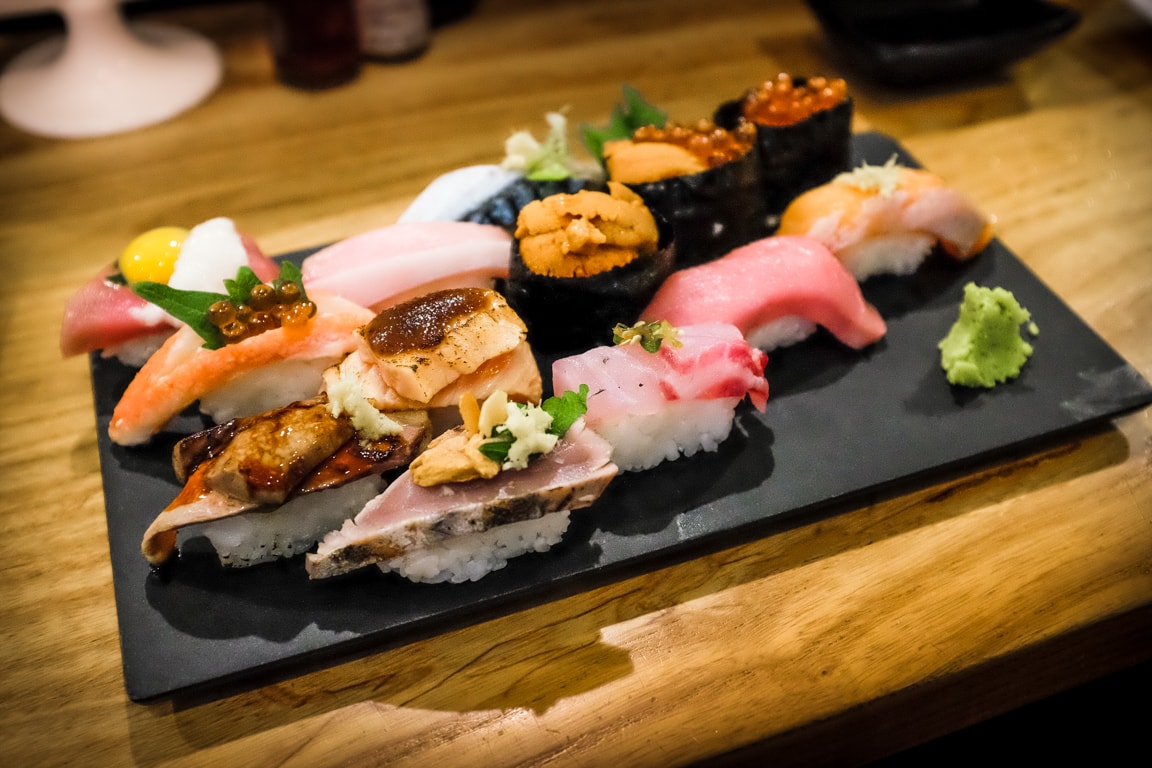
“Birthday Sushi” Austin, 2016

こんばんは!Hello, how’s it going?

As you can see from today’s photo, we had sushi! It’s my son’s 15th birthday today, so we went to his favorite restaurant to dine on delicious Japanese food. Our friend prepared this amazing selection of sushi, which included some beef! It was all so yummy, I could have eaten all night.

I’m so happy that our kids are relatively open-minded about food. My wife and I love to try so many different kinds of cuisines, so Bay and Koa are used to giving new foods a try. Of course they have certain foods that they really don’t like, for instance Bay cannot stand mushrooms, and Koa doesn’t like sushi rice (although he likes the fish). I am pretty sure that in time, they will grow to enjoy these foods as well! 😄

The photo below is from the box of uni (sea urchin) that we enjoyed. It was from Japan and was super delicious! I wish I could eat it every day. 🍣

"Japanese Uni" Austin, 2016
Photo info: FUJIFILM X100T, 23mm, f/3.2, 1/110 sec, ISO6400
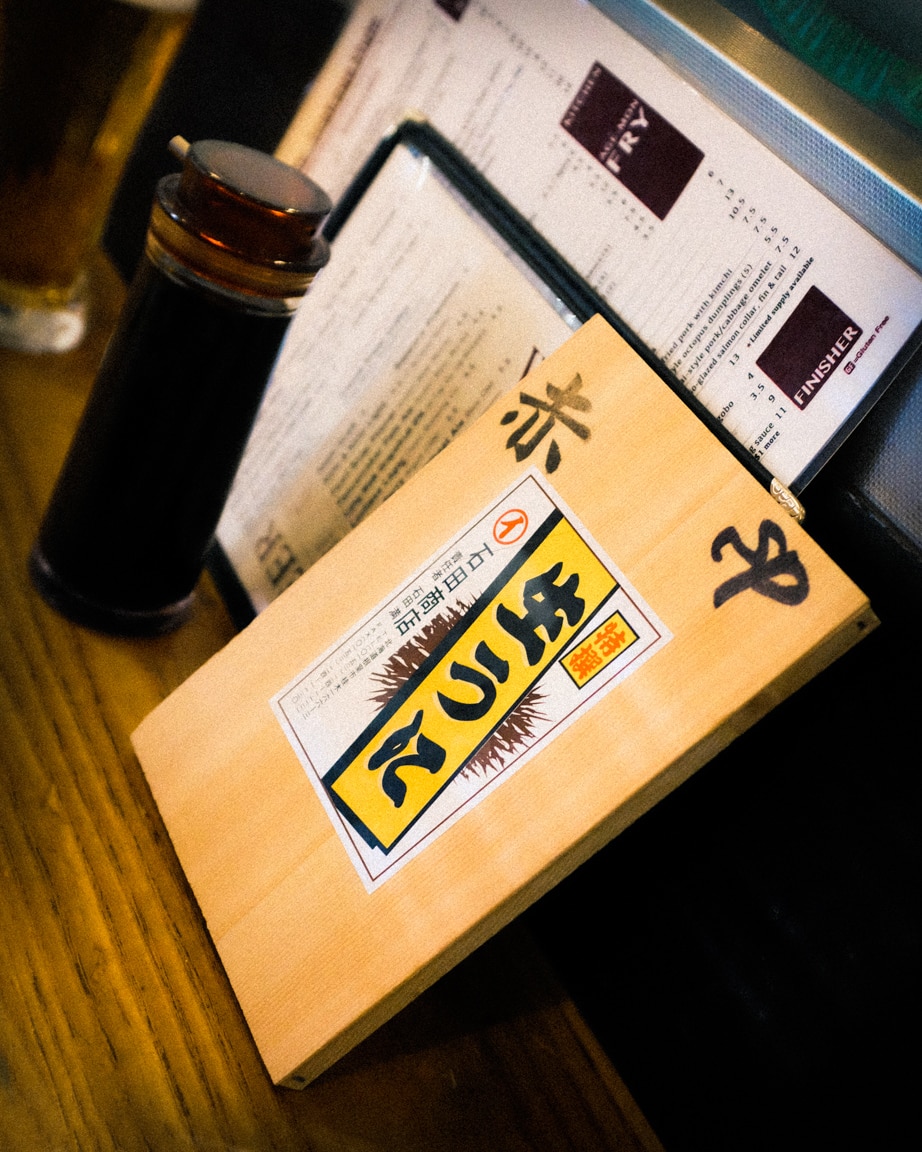
“Japanese Uni” Austin, 2016

Tonight’s photos were taken at a relatively high ISO of 6400, but the Fujifilm X-Trans II sensor handles it amazingly well. I don’t mind shooting at 6400 at all with my X100T, in fact, I have the Auto ISO range from 200-6400 which is something I would use only in extreme situations on my dslr. I think it is fantastic that cameras keep getting better at high-ISO. It’s the area where I think we can benefit the most.

I used the Fujifilm standard Provia film simulation for both of these photos, and in Lightroom I adjusted the white balance a tiny bit, deepened the blacks, brought back some shadows, and bumped up the vibrance a little. I then added a slight vignette and a some of grain, which is pretty much my standard look these days.

I hope you had a great Thursday. We’ve almost made it to the weekend!

おやすみなさい!

– B Barron Fujimoto

Texas Sunset Edit

"Texas Sunset" Cedar Park, 2016
Photo info: FUJIFILM X100T, 23mm, f/8, 1/1250 sec, ISO400
“Texas Sunset” Cedar Park, 2016

こんばんは!How’s it going?

This evening I happened to glance outside our window and see some light streaming above a cloud, so I grabbed my camera, ran upstairs and snapped this photo. I used the circular polarizer because I was shooting through a window, but I don’t know if it helped at all. I suppose it could have reduced any reflection, but I wonder if the angle was correct.

At any rate, I got a nice capture and decided to see what I can do in Lightroom. Normally I will import the jpeg and then apply a nice “S-shaped” tone curve, adjust vibrance and saturation, apply some grain and save for upload. But tonight I decided to spend a bit more time to do some more editing.

A fun thing I did was to paint in some selections using the Wacom tablet. First, I painted in some clarity and sharpening around edges of the center clouds to add detail. Secondly, I made a new brush to darken some areas using negative exposure. You can see in the top-right corner, and center-top that I darkened the sky a bit to add more variation. The tablet is so fun to use with Lightroom – I highly recommend getting one!

To add a bit more color, I adjusted the vibrance and saturation, but also added a few linear gradients. There’s one coming up from the bottom added some more warmth with a pale orange color and white-balance shift. Then up in the sky, I added one in the upper-right to add a touch of purple via white balance shift, and in the upper-left, some blue. It’s really fun to add color gradients or white balance edits this way. I did it quite a bit in another photo of mine several months ago.

I think the final image of the cloud is a bit exaggerated, but I like it. I think it could have been even better if there was a jet streaking across the sky leaving a contrail behind, or even a few birds flying in the sky. Just one more element to add more interest.

Anyways, for comparison, here’s the original image:

Unedited Photo
Photo info: FUJIFILM X100T, 23mm, f/8, 1/1250 sec, ISO400
Unedited Photo

If you use Lightroom and are curious, I’ve saved all my adjustments to a preset and shared it, along with the original JPEG below. I use Lightroom 5, but the preset probably works with other versions as well. Enjoy!

Get the original image and Lightroom 5 Preset via Google Drive


In other happenings, I was reading about the terrorist attack in Istanbul. How awful… so much violence in the world. 😔 Whenever I turn on the news, there are so many negative things being reported… floods, airplane crashes, hate crimes, etc… I almost would rather hide away from all that. But what can you do but focus on being positive? Teach your kids to be open-minded, respectful, and compassionate, especially when they are young. I guess that is a start.

Anyways, I hope you had some moments of joy today. Even the little things! 😄

おやすみなさい!

– B Barron Fujimoto

Today’s daily prompt from WordPress was coincidentally Clouds! ☁️

Polarizer

"Storm's Coming" Austin, 2016
Photo info: FUJIFILM X100T, 23mm, f/2.8, 1/9000 sec, ISO400
“Storm’s Coming” Austin, 2016

こんばんは!

Tonight’s photo is of (surprise!) another cloud. ☁️ I realize that clouds are one of my favorite subjects to make photos of, so I did a little research on how to make better photos of them.

One thing that people have recommended using is a polarizing filter. Usually this type of filter is used to reduce reflections off of glass or water, but it also gives better definition and contrast to the sky and clouds. I honestly don’t know how much of an effect it will have since I usually do some editing in Lightroom to get the style I like, but since I already own a circular polarizer, I figured, why not?

After buying a step-up ring so that the 55mm filter would fit on the 49mm thread on my X100T, I took a few photos while I was out and about with my son Koa. There were a lot of nice clouds in the sky because of the approaching storm so I took the opportunity to make a few photos.

Below you can see how the polarizing filter can cut the reflections out of the photo. The circular polarizer actually rotates so you can dial in how much of an effect you want to achieve. In the photo on the left, I kept a pretty heavy reflection, but for the photo on the right, I rotated the filter and the reflections disappeared like magic! If you click on the photos, you can see that the cloud reflections on the hood of my car were eliminated as well. Pretty slick!

Anyways, I played around with the image in Lightroom and eventually I found the look I wanted, which is the black and white version below. I used Nik Silver Efex Pro2 to convert the color image to black and white.

"Reflection" Austin, 2016
Photo info: FUJIFILM X100T, 23mm, f/2.8, 1/1700 sec, ISO200
“Reflection” Austin, 2016

I hope you had a nice Tuesday! We’re almost over the hump… just one more day and then it’s a straight shot to the long weekend here in the States. 😄

おやすみなさい!

– B Barron Fujimoto

Usagi Shamoji

"Usagi Shamoji" Cedar Park, 2016
Photo info: FUJIFILM X100T, 23mm, f/2.8, 1/100 sec, ISO1600
“Usagi Shamoji” Cedar Park, 2016

こんばんは!

Today’s photo is of our Usagi Shamoji (usagi=rabbit; shamoji=rice spoon). We’ve had several different shamoji over the years, but I really like the fun(ny) ones, such as the rabbit spoon. Not only does it look nice, but it’s practical too since it stands up! The “standing fish” spoon is also a good design. We had one of them for a couple years until it cracked, and now we have the rabbit spoon. I recommend either one. 😄🐰🐟

FYI, the world’s largest shamoji is at Miyajima, Japan. 🇯🇵 It’s worth checking out if you visit the island!

I hope you had a great Monday!

おやすみなさい! – バロン Barron Fujimoto