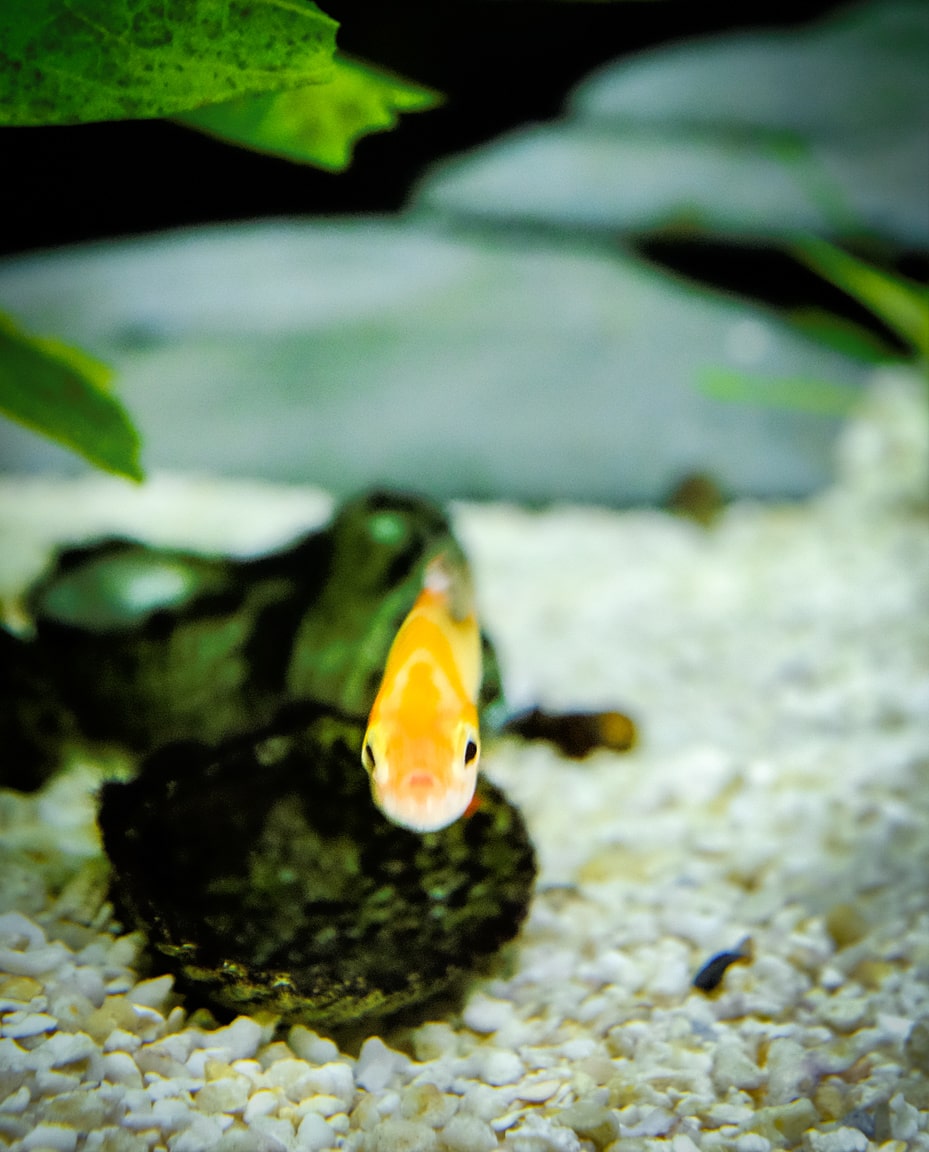
Hello, Cloud. And Why I Cull My Photos.

"Saying Hi" Cedar Park, 2016
Photo info: FUJIFILM X100T, 23mm, f/6.4, 1/950 sec, ISO400
“Saying Hi” Cedar Park, 2016

こんばんは!Hello, how’s it going?

Well, I didn’t expect to take another cloud photo for today’s snapshot, but as I was doing the dishes this evening, this beautiful cumulus specimen appeared over the trees to say hello. I couldn’t pass up the chance, so I shut off the water, grabbed my camera which was in the other room, then came back to the kitchen to take four photos of the cloud. I liked this one the best, and deleted the other three.

I am a big proponent of only keeping the best version of a series of photos if possible. In this case, the other three were simply different views of the same scene, some farther away from the window, and some closer. The photo above was the image that I felt was framed the best by the window, so it became the “keeper” and the other three got the “X” (marked for deletion).

I’ve heard people say that you should never delete any of your photos. Storage is cheap, after all. It doesn’t cost anything extra to keep every single photo you take, right? While this may be true, I personally found that I was paying the price in speed. The large amount of images was bloating my Lightroom catalog and slowing things down.

Conversely, by only keeping one photo from a series of images, my Lightroom catalog is lighter and more responsive. Plus there’s less visual clutter when I scroll through the catalog, or when I browse my images online at photos.google.com. I can scan quickly. I don’t have to wade though a bunch of mediocre versions of the same subject (and believe me when I say that I capture a TON of mediocre images!).

For me, it’s important to cull the photos soon after Iimport them into Lightroom or copy them to my computer. (I even try to delete photos before that in-camera) The quicker I get rid of those photos, the less time they have to make an imprint in my mind. I believe everything takes a portion of the brain’s attention, even a tiny bit of my subconscious. So, once the photos cease to exist, it frees that part of my brain’s hard drive, as well as my computer’s hard drive. At least that is what I believe. 😌

When I first began culling my photos, it wasn’t easy to delete photos. Yes, I was a digital hoarder at the time! But one thing that helped me was to imagine that my Lightroom catalog was a slideshow that I would be presenting to an audience. Would I want to show them 4 pictures of the same cloud? No way. They would get bored (and annoyed) quickly. I would pick the best photo to show them, and respect their time and attention. So why wouldn’t I treat myself with the same respect?

Once I got comfortable with culling quickly, it became easy, and it actually became fun! Making decisions and not looking back or regretting my actions gave me a sense of control. It won’t change the world, but it did affect the way I felt. Plus, once you start decluttering, it just snowballs and it feels great!

Okay, I seem to have rambled on a bit (again). So, back to the photo at hand…

For the Lightroom edit, it was similar to my previous post’s photo, with the addition of selective white balance. I gave the cloud a warmer tone, and the sky a cooler tone. That’s it! I’d estimate that I spent about 4 minutes in Lightroom before exporting.

I hope you had a nice day today. Let’s have a great Friday to close out the work week!

As always, if you have a comment or question, let me know.

おやすみなさい! – B Barron Fujimoto

Clouds and My Post-Processing

"Cloud" Austin, 2016
Photo info: FUJIFILM X100T, 23mm, f/10, 1/1100 sec, ISO200
“Cloud” Austin, 2016

こんばんは!

For the past week or so, we’ve been fortunate to have some amazing-looking clouds in the skies here above Austin. ☁️☁️☁️ And of course, I’ve been taking many pictures of them!

The photo above was taken from my car while I was on my way home from work. (Don’t worry, I was stopped at the light) The sky was very bright, with the sun behind the cloud, but the camera was able to capture most of the details. I keep the exposure compensation dial set to underexpose by 1/3 to 2/3 of a stop because I would rather keep my highlights intact and don’t worry about clipping the shadows. In fact, during post-processing, I will often let the left-side of the histogram go full black. I guess I like that high-contrast, richness on the darker side.

As you can see, the image is not very realistic, but I am not really going for capturing reality. I love that there is so much detail in the center of the clouds which you really cannot see with the naked eye. Why not bring it out in the photo? Of course the photo started off as a picture of a real cloud, but I’ve edited it into a version of the cloud as I would like to see it.

There is has been a lot of discussion in the photo blogosphere about Steve McCurry photoshopping his images, with some people feeling betrayed or tricked because of the edits. But I am not bothered by the photo manipulation. If you are creating art, then go for it! If you are documenting real-life, then don’t edit. That’s fine too. But be honest and don’t deceive people. If someone asks me if my photo has been edited, I’m more than happy to explain exactly what I edited. That’s part of the process.

Even as I take photos of everyday life, I will do some amount of editing. That happens before I even press the shutter button since I have already chosen my film simulation and highlight, shadow, and sharpness settings.

For my post-processing in Lightroom (version 5x), here are the steps I typically follow:

  1. Level and/or “upright” – I will use the level tool in the cropping area to make sure horizons are level, and for architectural photos, I’ll use the Upright tool in the Lens Correction section. I didn’t do this step for the cloud photo, however.
  2. Crop – My preferred aspect ratio these days is 4×5, but this photo was taken square in-camera.
  3. Remove dust, distracting smudges, or dirt – Spot removal tool. I didn’t need to for this photo.
  4. Adjust white balance – Using the eyedropper as a start. Typically only needed for indoor shots.
  5. Adjust tone-curve – I have saved a preset, a gentle S-curve, which adds contrast.
  6. Tweak the exposure – Exposure, highlights, shadows, whites, and blacks sliders.
  7. Adjust color – Vibrance, saturation, HSL. For this image, I brought the saturation down a bit.
  8. Add grain and/or a vignette – Just a vignette for this image, albeit a strong one. I used a combination of Vignette in the Effects section, and then a few graduated filters with lower exposure.
  9. Export – Resizing and saving for blog, Flickr, and Instagram.

Nine steps looks like a lot, but I can usually get through them in less than 3 minutes. I try to spend as little time in Lightroom as possible!

Well, this blog post kind of grew, didn’t it? 😝

I hope you had a nice Wednesday, and let’s have a great Thursday!

おやすみなさい! – B Barron Fujimoto

Summer style

"Cheesecake on the Floor" Cedar Park, 2016
Photo info: FUJIFILM X100T, 23mm, f/2.5, 1/60 sec, ISO3200
“Cheesecake on the Floor” Cedar Park, 2016

こんばんは!Good evening, how are you doing?

Well, the kids officially started summer vacation this week, and Koa has been spending a lot of time at the neighborhood pool having fun and getting very tan. In the above photo, you can see the summer attitude – eating dessert on the floor, still in swimming trunks, under the piano. What a life!😎

Thinking back to my childhood summers, I also spent quite a bit of time swimming at the pool. 🏊 My parents belonged to a tennis club 🎾 and my brother and I would amuse ourselves with swimming, playing racquetball, or playing the pinball machine at the snack bar. I have a wonderful memory of eating a delicious burger 🍔 on a wheat bun with alfalfa sprouts, then playing the “Supersonic” pinball machine. Good times!

I hope you had a nice Tuesday!

おやすみなさい! – B Barron Fujimoto

Blog Tags

"Waterfall Position" Cedar Park, 2016
Photo info: FUJIFILM X100T, 23mm, f/2.5, 1/50 sec, ISO6400
“Waterfall Position” Cedar Park, 2016

こんばんは!Hello, how’s it going?

Tonight I spent a couple hours working on this blog, specifically the tagging of posts. I read a couple articles about different ways to tag, or rather, different philosophies and how to use categories and tags, but most seem to apply more towards commercial blogs, and not the traditional personal web log.

I’m not sure how I am going to organize the categories, since it seems like everything can go into just a few main groupings. That’s if I use the categories like a main site navigation. Which I am leaning towards doing, then using tags to group blog posts.

Ever since I started blogging daily, it has changed my way of thinking about this blog. How do I categorize those daily posts? At the moment, they are in a “Slice of Life” category… but this whole blog has turned into a “Slice of Life” vehicle… Occasionally I will have a movie, or product review, but these seem to be grouped in with the daily posts. However, some are stand-alone. This seems weird… I don’t like putting blog posts in multiple categories, but I kind of need to if I put different subjects into a daily post (which I like to do).

So… maybe the solution is in tagging. I’m thinking that may be the way to go… converting some of the categories into tags, and eventually the categories can just be down to one (which means I don’t need to call them categories). I will just have the blog posts, and then pages.

I guess that’s kind of back to an earlier, purer way of personal blogging, right?

It’s fun to think about! (I’m weird like that)

So, the blog work continues.

Today’s photo is of Anko, who, like many kittens, finds odd positions to sleep in. The one above is called “Waterfall Position” since it looks like she is headed down the falls! I used my normal Fujifilm black and white + yellow filter film simulation, then adjusted the tone curve, added grain, and slight vignette in Lightroom.

I hope you have a nice evening!

おやすみなさい! – B Barron Fujimoto

** UPDATE **
I’ve removed the categories from the menus and sidebars, and made the tags more prominent!